Safeguarding the data stored on computer is crucial in running business or otherwise. No matter how we maintain the data, something or the other is going to damage the information stored. There are ways such as storing data in hard drives, compact disks, taking hard copy or storing them in USB sticks. USB sticks are easy to carry, help in data transfer and are hugely affordable for less amount of information. However, there is always an on-going debate regarding what file system should be used and what technologies support USB stick in a better way.
Commonly used file systems are FAT 32 or NTFS for USB drives. For example, if the Operating System you are using is Windows, then you must prefer using NTFS. In addition, take care when ejecting certain USB drive. Generally, the drives are damaged due to impatience. Regardless of the file system usage, not unmounting the drive properly could lead to damage and data loss. All flash drives have limited number of read/write cycles that slowly cause data loss over passage of time.
Usually, drives are damaged when you do not safely remove them from the computer. Windows keep storing requests in “Write Cache” and perform them in a go. When you give command to stop USB, OS writes it to a cache. You must wait until OS tells you to remove it, because that ways it asks every background program to stop accessing the USB drive. However, if you do not wait, you end up corrupting the file system and damaging data contained in it.
Another trouble with USB drive is the speed. In a Windows only environment, one can optimize the performance of USB device by following these steps below.
- Locate Device Manager and search for USB stick under Disk Drives
- Right-click on your device, select Properties
- In Policies tab check the option “Better performance” instead of “Quick removal” and confirm
When you select “Quick Removal”, Windows tries to write data immediately in USB while if using “Better performance” Windows tries to cache data instead of writing and will flush all only when removing it (Using “Safely Remove Hardware”). When selecting Better performance, remember to remove the USB safely else you might lose data.
One of the worst situations is when USB drive gets corrupt irrespective of everything and user loses crucial data. There is no way to perform manual data recovery of USB drive. Hence, trusting third party utilities must be preferred. Kernel for Windows Data Recovery is one such tool that enable user to perform complete recovery of data be it USB, IDE, EIDE, SCSI, SATA, PEN or ZIP drive. Embedded with three scanning modes namely Quick Scan, Extensive Scan and File Trace Scan modes, the software never fails to perform complete recovery irrespective of reason of corruption. The software can be downloaded free of cost and tried before purchase. The trial edition allows user to perform complete repair and preview the files. However, in order to save anything, user must purchase licensed version of Kernel for Windows Data Recovery Software. To know more about of this software click here: http://www.recoveryfiles.org/windows-data-recovery.html

Microsoft Windows Server empowers most of the worldwide data centers and enables all size business organizations to deliver a quality service. The latest Windows Server 2012 redefines the server category, delivering hundreds of new features and enhancements spanning visualization, networking, storage, user experience, cloud computing, automation, and many more. In fact, MS Windows Server 2012 helps you transform your IT operations to deliver a new level of business value.
 Although, there are different types of data stored on the Windows server storage media but they are very vulnerable to several risks, corruption of Windows partitions including corruption of Windows registry, MBR corruption, sudden system shutdown, malicious virus attacks, software errors, natural disasters, human errors, hardware failure, voltage fluctuation, power failure etc. The most common reasons behind the hard disk failure are as follows:
Physical Failures (Man-made data disaster):
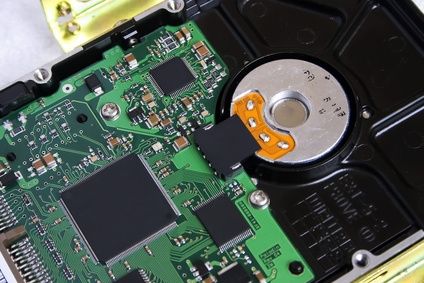
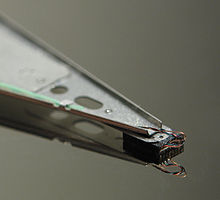
Physical failure of hard disk drive is very common in these days and it happens due to sudden switch off, power failure, hardware malfunctioning. As, data stored on the surface of hard disk in the form of magnetic impulses data are very vulnerable to their surroundings. Any improper handling of hard disk of Windows server 2012 may cause trouble of data loss. In addition, Drive Alignment Drift is another reason of such data loss problems.
Logical Failures (Natural data disaster):
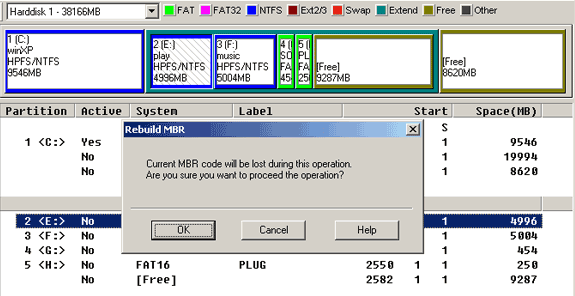
- If the master boot record gets corrupted due to any possible reason then the system shows error message of MBR error. It results lose of data from Windows server 2012.

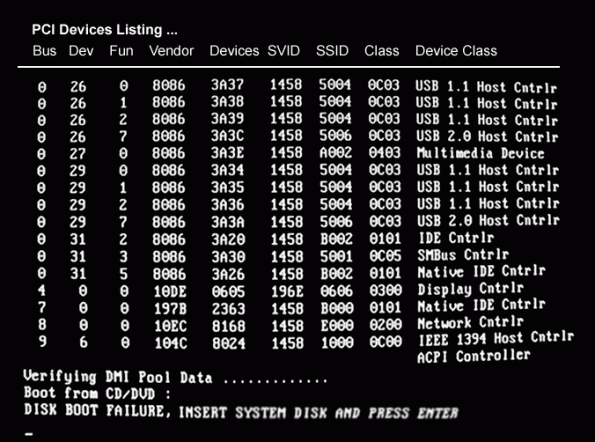
- When the boot sector of hard disk gets damaged due to any cause then it results improper functioning of system and it may leads to data lose.

- Sometimes, users delete important data unintentionally from the hard disk drive.
- Bad sectors of a Windows hard disk are a portion of the Hard disk that cannot be used anymore and the data stored on those bad sectors may get lost.
Methods to recover and restore Windows server 2012 data:
 Backup of data is always very useful and it plays a vital role in data disaster situation. Now backup creation is very easy as there are a number of reliable utilities for this. Windows Server 2012 has been equipped with Data Deduplication feature for an NTFS volume. Data Deduplication reduces the used space on the hard disk drive by storing duplicate fragments of the volume’s files only once.

Hard disk drive of Windows server 2012 uses FAT and NTFS file system to store and fetch data on hard disk. Unfortunately, if you have not created any back or your backup file has been corrupted due to any possible reason then you can try a reliable FAT and NTFS data recovery tool : http://www.softwaredatarecovery.net/windowsrecovery.html
 According to a report, about 32% of all computer users lose their files due to events that are under their control. Different types of data stored on storage media are very vulnerable to several risks, corruption of Windows partitions including corruption of Windows registry, MBR corruption, sudden system shutdown, malicious virus attacks, software errors, natural disasters, human errors, hardware failure, voltage fluctuation, power failure, and so on. Many times, users face problems due to RAW hard disk. When a hard disk partition used in its native mode without having a file system, usually call it as RAW. As there is no file system on it, you come across the message that partition need to be formatted when you click on it. The most common reason is hard disk failure that is mentioned as follows:
Hard Disk Failures:
Physical Failures (Man-made Disaster):
 Physical failure of hard disk drive happens due to sudden switch off, power failure, hardware malfunctioning etc. Since data is only magnetic impulses on the surface of a hard disk so they are very vulnerable to surroundings. And, ridiculous handling of hard disk may cause trouble of data loss. Drive Alignment Drift is another reason of data loss problems. The minor changes in the read/write heads wouldn’t affect generally and data still gets written & it will be read later. But, there is some data that scarcely ever gets re-written, and that is the Sector ID Headers.
Logical Failures (Natural Disasters):
-
Master Boot Record Failure: The master boot code scans the partition table of hard disk for the active partition, finds the starting sector, loads a copy of the boot sector from the active partition into memory and then transfers control to the executable code in the boot sector. If the master boot code cannot complete these functions, the system shows error message of MBR error.
-
Boot Sector Failure: The boot sector is a specific part of a hard disk, floppy disk, and other similar data storage device. It is loaded to memory and executed as a part of the bootstrap sequence. Mostly boot sector failure happens due to the defection of boot sector virus which is usually spread by infected floppy disks.
-
Accidentally Deleted Data: Some time, users delete important data without thinking about its importance. When it deleted even from system’s recycle bin, they become unable to access them easily. When you delete your system’s data by pressing SHIFT key, it get deleted permanently which cannot be accessed usually.

-
Bad Sectors: Bad sectors of a hard disk are a portion of the Hard disk that cannot be used any more. Data stored on bad sectors of the hard disk must be recovered before use as they may get lost.

Solution – Hard Disk Data Recovery:
-
Replace the (Circuit Board) PCB of the hard drive.
-
Replace the old Firmware with updated firmware.
-
Replace the Head Stack that causes hard disk head failures
-
Move the disk to another Drive

-
Use Data Recovery Software
By applying above mentioned methods you can minimize your data loss trouble. Unfortunately, if you have lost your very important data & you want to recover them at any cost then should look for a trustworthy third party tool. Regular updated backup is the preferred way to handle such data disaster situations but occasionally it may also get corrupted. However, several tools promise for absolute recovery of lost Windows hard drive data but very few of them are effective. Users can resolve logical hard disk failures (e.g. MBR failure) by choosing Recovery mode option offered by the bootable disc of operating system. But, it does not guarantee for complete solution. All the data deleted or lost from the hard disk or other storage media cannot be extracted manually so it is necessary to utilize a proficient third party tool like Kernel for Windows data recovery tool.

Kernel for Windows data recovery tool is professional third party tool that enables you to recover inaccessible or lost image files, video files, music files, document files, database files, email files, media files, archive files, web files and graphic files from Windows hard disk. It is integrated with three effective recovery modes & finally displays all the recovered files in a hierarchical structure to save them at desired safe location. This tool supports FAT 16, FAT32, NTFS and NTFS5 file systems and IDE, EIDE, SCSI, SATA, PEN, ZIP, and USB drives. You should must visit this site for seeing detail http://www.softwaredatarecovery.net/windowsrecovery.html
Running an organization without an email client is excessively dangerous these days. There are endless tasks that cannot be completed in an email client’s absence. To establish a good communication over business or internal matters, having a reliable email client is very important. There are various email clients available in the market and depending on individual choice and need, he can purchase on for his organization. Novell GroupWise is one of the popular client after MS Outlook.

There are instances when user has to open cross platform emails immediately. For example, I had been given a task of dealing with foreign client in my company. He uses MAC machine, hence the email client used by him was Apple’s MBOX Email. He sent me some crucial information via emails and I failed miserably to access them. I had to ask him to convert everything and send in a common email client but it proved very troublesome.
Hence, I started looking for solutions to avoid such mishaps in the future. I tried to setup a local IMAP Server and copy entire GroupWise email via its IMAP interface. After the complete copying, I put these emails in local IMAP Server. It did solve the issue but took a lot of hit and trial. Moreover, It was difficult to complete the process on my own. I found a technical executive to perform this task.
After some time of research, I found third party software for entire conversion. Easy to use, proficient and effective software performs complete Novell GroupWise to MBOX conversion instantly! It offers an efficient solution for all the users who want to move GroupWise mailbox email messages into Apple Mail application format. By using it, you can easily convert a single mailbox at a time or unlimited number of mailboxes concurrently. There are various modes set in the tool that help you perform email migration according to your need. The default mode is applied to the currently opened mailbox in GroupWise for conversion into MBOX. Another mode of Single Mailbox Migration is Login mode, which has three sub-modes (online, caching and remote mode) to perform this migration.
In Online Mode, you need to specify User Id, Password, IP Address and Port number information for migration while in Caching Mode you are required to specify the User Id, Password and caching mailbox path of particular mailbox for migration. Lastly, in Remote Mode you have to specify remote mailbox path where the mailbox copy is saved and provide password (if any) to connect and migrate.
In addition, Command Line Mode assists you to migrate mailbox without opening or accessing GroupWise.exe. You just need to type the path in Command Line mode and access that account for migration. Multiple mailbox migration is the second email migration mode that can be performed by creating NUCON batch file having account details of GroupWise mailboxes. The NUCON file can be created onboard with the Add Record Process or created from an Excel file containing unlimited GroupWise mailbox account information. The GroupWise to MBOX email converter utility is available with a free trial version for evaluation. It supports all GroupWise Server versions such as 6, 6.5, 7, 8 and 12.
GroupWise is an instant messaging and collaborative program which supports other email client features such as calendar, contact list, document management etc. The GroupWise platform comprises the client software for Windows, Mac OS X, and Linux, and the server software supported on Windows Server, NetWare, and Linux. Many users always ask how they can access their emails globally. As you know the present era is the era of Globalization and everyone wants to access his/her emails & other data from any place of the world. The answer of this question has been given by the latest technology. In order to fulfill your need of global accessibility of email items, there are many tools launched and Microsoft’s Office 365 is one of the most suitable platforms.

With the help of Microsoft’s Office 365 application suite, you can access email messages, documents, contacts, calendars & other email items in cloud computing environment. This application can be used for small, medium & large organizations. Migration of GroupWise email items into Office 365 Cloud based service is not possible manually & it can be accomplished by a powerful third party tool. In this way, the most significant thing is the selection of a trustworthy tool that can migrate your GroupWise emails into Cloud environment of MS Office 365. Usually, ordinary third party tools cause various errors & issues while migrating GroupWise emails into Office 365 environment.
Kernel Office 365 migrator for GroupWise is the suggested the most preferred tool to perform GroupWise to Office 365 migration in an effective way. This tool offers you an easy way to migrate GroupWise mailboxes to Office 365 and gives a better emailing experience in cloud environment. We would like to thanks to the advanced algorithms integrated within the tool that make possible to the GroupWise to Office 365 conversion hassle free. This application offers you the flexibility of hybrid email organization where you migrate only a few mailboxes to cloud environment & the remaining keep in the legacy system. If you want such kind of email configuration then select the Kernel Office 365 Migrator for GroupWise which offers you option to migrate a single or all mailboxes from GroupWise to Office 365.
There are two different options to successfully convert single or multiple mailboxes to cloud of Office 365. Those options are Single GroupWise mailbox migration and Multiple GroupWise mailbox migration. In case, you want to migrate only a specific kind of email item like Mail, Tasks, Calendar or Contacts then you can perform this task successfully. It also facilitates you to migrate GroupWise mailbox items to Office 365 within a specific date range. It is embedded with interactive, GUI and self-explanatory features, so that you can perform GroupWise to office 365 migration process in a quick & easy way by taking less time.
Migration of GroupWise emails to the Office 365 format is the best option to access email items in a cloud computing environment. Kernel Office 365 migrator for GroupWise is a recommended tool to perform this task in an efficient manner.
Communication is incomplete without exchange of emails and MS Outlook is the best way to send/receive emails. It is easy to use, get hold of and make amendments. It works in accordance with MS Exchange Server that takes care of proper delivery of emails to their respective addresses. Even if there is less or no connectivity, emails are delivered without fail.
![]()
Offline Storage Table files take care of emails in offline mode. This folder stores entire email data including mailboxes, attachments etc in an offline folder. This folder allows user to work offline. As soon as MS Outlook finds internet connectivity, the OST folder is synchronized with Exchange server and emails are sent/received. OST files work as backup also when user accidently deletes his email id or under some virus attacks.
There are instances when you might be trying to synchronize the OST file in MS Outlook 2002 with MS exchange Server and it fails giving you the following error:
“Task Microsoft Exchange Server reported error (0x00040820): Errors in background synchronization. In most cases, further information is available in a synchronization log in the Deleted items folder.”
This is one of the problems in OST files, called as oversized OST file issue. When OST files reach their upper size limit that is of 2GB, users are unable to access entire emails and other related data from these offline files. This was a common issue with MS Outlook 2002. One can take some preventive measures to avoid such mishap:
- Delete all unwanted items from the Server based email folders permanently
- Move entire data from synchronized folder to a non synchronized folder on the MS Exchange Server
- Move data from synchronized folder to a PST (personal storage table) file and delete the data from synchronized folder permanently
MS Outlook has an inbuilt tool to deal with such issues. Scanost.exe file can be easily located at:
C:\ Documents and Settings\ username\ Local Settings\ Application Data\ Microsoft\ Outlook\ outlook.ost
Scanost.exe is the utility that helps in removing extra space, which appeared due to the permanent removal of this data. If there is no empty space, Scanost.exe will not work at all. It runs to synchronize and compare missing files and is an integrity check tool.
The best alternative to successfully deal with OST files error is to convert it to PST file format and save it separately. Permanently deleting or shifting emails from the inbox is not so easy and doing it all manually requires high expertise and technical skills.
Usage of third party software, Kernel for OST to PST software is preferred. This user-friendly, easy to use interactive software easily convert OST to PST within few clicks. Follow this http://www.free.convertosttopst.com to get more detailed information about conversion. The software flawlessly converts entire mailbox items keeping their hierarchy and format intact. The product is compatible with almost all MS Outlook and Express versions. Moreover, the Kernel for OST to PST software comes in a trial version that can be downloaded to get some idea about it before purchasing.
At times, user may encounter one of the following error messages while working with MS word.
HRESULT: 0x800A142D
VB Error: 5165
“Word cannot open the existing [square]”
or
HRESULT: 0x8001010A
VB Error: -2147417846
“The message filter indicated that the application is busy”
![]()
Cause
MS word may behave like this, because of the corruption in global template file that is used by Word. Corruption of one or more invalid global template files may cause an out-of-process automation client to throw one of the above mentioned error messages to erupt.
Solution
If you are encountering one of the above-mentioned errors, you can temporarily rename the global template to determine if it is the actual cause of the problem. When you rename the global template, several options get reset back to their default settings, along with custom styles, custom toolbars, macros, and AutoText entries. Renaming the global template file rather than deleting it enables you to restore these settings in case the template is not corrupt.
To rename the global template file follow the underneath steps:
- Quit all instances of Word, including WordMail.
- Click Start, clickFind, and then click Files or Folders.
- In the Named box, type the global template name for your version of Word.
- In the Look In box, select your local hard disk drive (or an alternate user template location if you are running Word from a network server).
- Click Find Now to search for the file.
- For each occurrence of global template that appears in the Find dialog box, right-click the file and then click Rename. Give the file a new name, such as OldNormal.dot or Normal-1.dot.
- Minimize the Find dialog box.
- Restart your automation client to start Word.
Steps may differ with varying versions of Microsoft Windows. You can refer your product documentation to complete these steps.
If Word starts working as early means, you have succeeded to resolve the problem. In this case, the major problem was the damaged global template. However, this cannot be the only possible cause for the given error message. Many other complications may turn out to be the actual cause. If it is so, you need to take help of professional word repair software like Kernel for Word Repair tool. This proficient tool can combat any sort of corruption issue in the file. Kernel for Word Repair tool provides immediate access to the file in minimal possible time.
While trying to synchronize the offline address list on a Microsoft Exchange Server of any version (Microsoft Exchange Server 2003, 2007 and 2010) you may receive the following error message in the Sync Issues folder:
“0x8004010F An object could not be found”
Once you receive this error message, you will not be able to work on MS Outlook Exchange. Yet, if you try to send an e-mail message, you may receive the following error message if you are using Outlook 2003:
Task ‘Microsoft Exchange Server’ reported error (0x8004010F): ‘The operation failed. An object could not be found.’

Cause
You may come across this behavior if problem lies in Properties of the Address lists setting in Exchange System Manager. Such error messages usually pops up when one of the following conditions is true:
- The offline address book list object has a missing address list.
- The offline address book list object has an incorrect address list.
Resolution
If you find any of the above conditions true with your MS Outlook Exchange 2003 if you view Properties in the Address lists setting in Exchange System Manager, you can go for EDB recovery using underneath method:
1. In Exchange System Manager, expand the Recipients container.
2. Click the Offline Address Lists container.
3. In the right side of the pane, right-click the offline address list object, and then click Properties.
4. On the General tab, verify that a valid address list is populated under Address lists. If a valid address list is not populated under Address lists, you must add one.
Note The default address is the global address list.
5. Click OK.
6. Right-click the offline address list object again, and then click Set as New Default if the offline address list object is not set.
7. If you made any changes, right-click the offline address list object again, and then click Rebuild.
This method of EDB recovery works successfully if you can determine the exact cause of the Exchange malfunction. However, it is not an ultimate solution for every error causing trouble in accessing MS Exchange. If the damage in Exchange is intense, you need to opt for third-party EDB recovery tool. Kernel for EDB recovery is an eminent tool to perform EDB recovery. This brilliantly designed tool can handle any sort of damage in MS Exchange server and of any version, irrespective of the intensity of the damage. With numerous troubleshooting features, Kernel for EDB recovery is a sure-shot solution for EDB recovery.
Let us consider you are using Microsoft Outlook 2002, Outlook 2003, Outlook 2007, or Outlook 2010 with Windows XP, with Windows Vista, or with Windows 7. While you try to read an email in the Microsoft Outlook Inbox or when you click the Send/Receive button, you receive any of the below-mentioned error messages:
“An unknown error has occurred. 0×80040119”
“An unknown error has occurred. 0×80040600”
Apart from the above error messages, when you try to delete an email, you may receive the below mentioned error message:
“Messaging interface has caused an unknown error”
The reason behind the occurrence of the above-mentioned error message is that either the PST file has become too large or there is corruption in the PST file.
![]()
In order to resolve the above-mentioned error messages and perform Outlook PST repair, you can use the Inbox Repair tool (Scanpst.exe). Though the Inbox Repair tool (Scanpst.exe) can resolve the errors in some cases, it is also not able to resolve the error in many cases. One such scenario when the Inbox Repair tool is unable to resolve the error and repair and recover the PST file is when the PST file is an ANSI-format PST file and is larger than 2 gigabytes (GB) in size.
However, the Inbox Repair tool is able to resolve the error and perform Outlook PST repair in a few cases. Follow the below-mentioned steps to resolve the error and perform Outlook PST repair using the Inbox Repair tool:
Step 1:Exit the Outlook
Step 2:Search the PST file
Step 3:Search the Inbox Repair tool
Step 4:Use the Inbox Repair tool
-
In the Enter the name of the file you want to scan box, type the file path of the PST file.
-
Click the Start button.
-
Once the Inbox Repair Tool process is complete, click the Ok button.
Once you have tried to repair the PST file using the Inbox Repair tool, check whether you can now read and delete emails. Also check whether you can Send/Receive in the Outlook without any errors. In case, you are still not successful, this simply means that you cannot repair the PST file using the Inbox Repair tool.
In this scenario, you can repair the PST file and resolve the error using a professional and efficient Outlook PST repair tool.
Kernel for Outlook PST Repair is one such professional and eminent third party Outlook PST repair tool that is specifically devised to accurately and flawlessly repair and restore Outlook PST files.
If somebody asks you question about the usability or popularity of zip files then each one of you would provide your own special reasons and benefits of using zip file formation. Perhaps, if we talk in terms of its popularity and usage then without any doubt, these days every next individual working in a corporate environment are making effective use of Zip files for performing different operations like searching and sharing vital data. In fact, the usage of archive files has become an integral and very important element of our day-to-day web experience. Adding to this, the concept of zip file formation has not just allowed in collecting and compressing different files all together, but also allowed sharing a bunch of files. The technique has provided computer users to assemble and store their important files collectively in a better format.

Now, just imagine how you would feel when one day you boot your computer system, try to unzip your important zip files and receive one of the biggest nightmares. The computer screen highlights the error message right in front of your face and makes you feel like a complete handicap person. You start feeling nothing could be done. You keep on wondering about option that could provide effective solution. Well, you don’t have to worry at all. It may seem that nothing could be really done, but today with the availability of zip repair utility, you can actually repair your archive files without much hassle.
In fact, if you believe that unzipping your zip files or performing zip repair operation after zip archives get corrupted is a tough call then you better change that perception.
Today, zip repair tool like Kernel Recovery for ZIP file recovery are easily available on internet and can help you recover files from corrupted ZIP archives. It is efficient in its working and can provide quick results for zip recovery. It performs the scan operation of the corrupt .zip file intensively and then recovers the damaged file, one after another. Once the recovery process gets completed, the recovered files and folders are listed to help user get a better preview.
Moreover, when it comes to the corruption of zip archives, the most common reason that results in the occurrence of such corruption is invalid or incomplete CRC values. But, by taking help of Zip Repair tool, you may even rectify such errors as well. The tool initially checks the integrity of data and then fixes incorrect CRC values and finally provides easy access to zip archive files. In addition, this tool can also be very effective if a situation arise where you have to repair large sized zip files. Adding to this, these days the tool is also available with self descriptive interface along with effective graphical support that further enables you to carry out the repair and restoration of file on your own. In fact, you don’t require any technical expertise to run this tool and perform the zip repair operation.
Certainly, without any doubt zip repair tool is an effective and easy to use compressed file repair tool that offer a lot more than the amount your actually spend in buying the complete version. These days, the trial version are also available, you can download it and know about its working procedure. And, once you are satisfied with its trial version, you can buy the original and complete version. You should must visit this site http://www.softwaredatarecovery.net/ziprepair.html